
When you add a contact to your Address Book, Textline can automatically add a Tag to these new subscribers. This Automation helps organizations better categorize contacts to create more targeted campaigns. There are many types of labels you can add to new contacts, including:
Here are step-by-step instructions for setting up this Automation in the Textline platform.
<div class="recipe-numbering-wrapper"><div class="recipe-numbering">1</div><p class="step-text" id="step1">In the Automations window, click New Automation.</p></div>

<div class="recipe-numbering-wrapper"><div class="recipe-numbering">2</div><p class="step-text" id="step2">Choose Build From Scratch. </p></div>
<p style="padding-left: 32px">This helps you create a new Automation without prefilled parameters.</p>

<div class="recipe-numbering-wrapper"><div class="recipe-numbering">3</div><p class="step-text" id="step3">Name your Automation. </p></div>

<div class="recipe-numbering-wrapper"><div class="recipe-numbering">4</div><p class="step-text" id="step4">Select the Contact Created Automation Type.</p></div>
<p style="padding-left: 32px">This step signals to Textline that you want the action to occur when a contact is added to your Address Book.</p>

<div class="recipe-numbering-wrapper"><div class="recipe-numbering">5</div><p class="step-text" id="step5">Set any desired conditions.</p></div>
<p style="padding-left: 32px">Conditions are rules that tell Textline when an Automation should fire or when it should prevent it from occurring. For example, if you’re setting up a location-specific Tag you can add a condition that the contact’s phone number area code must match a particular city.</p>

<div class="recipe-numbering-wrapper"><div class="recipe-numbering">6</div><p class="step-text" id="step6">Choose the Tag the contact with action. Type out your Tag.</p></div>
<p style="padding-left: 32px">This action directs Textline to automatically add the Tag “New_MKE” to new contacts with the area code 414. This helps you segment contacts by location. Press Next when you’re done.</p>

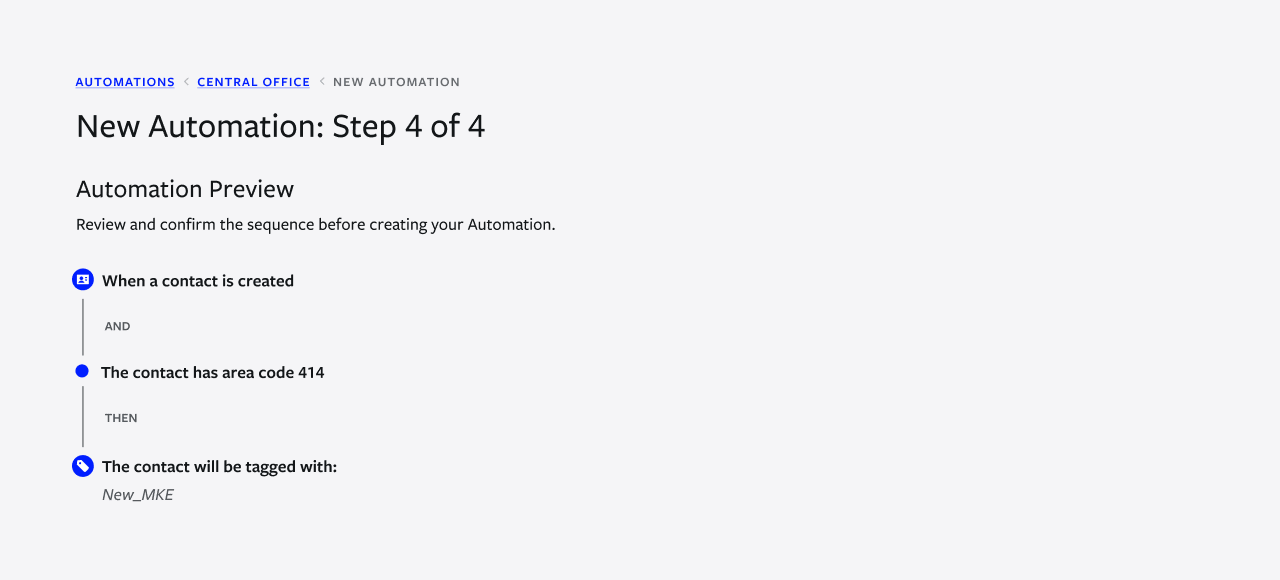
<div class="recipe-numbering-wrapper"><div class="recipe-numbering">7</div><p class="step-text" id="step7">Preview your Automation</p></div>
<p style="padding-left: 32px">Now it’s time to double-check your Automation. You can review the steps, conditions, and message actions.</p>
<div class="recipe-numbering-wrapper"><div class="recipe-numbering">8</div><p class="step-text" id="step8">Click Create Automation, and you’ll start tagging new contacts.</p></div>

Are you curious about what types of Tags you can add to your contacts? Let’s look at a few different examples of Tags you can use.
<div class="recipe-numbering-wrapper"><div class="recipe-numbering-step">1</div><p>Milwaukee (to segment a contact by location)</p></div>
<div class="recipe-numbering-wrapper"><div class="recipe-numbering-step">2</div><p>July_2025 (to segment the contact by date subscribed)</p></div>
<div class="recipe-numbering-wrapper"><div class="recipe-numbering-step">3</div><p>VIP (to show that a contact is a new customer on a premium plan)</p></div>
<div class="recipe-numbering-wrapper"><div class="recipe-numbering-step">4</div><p>Webinar (to show the way someone subscribed to an SMS program)</p></div>
<div class="recipe-numbering-wrapper"><div class="recipe-numbering-step">5</div><p>Lead (to show where a contact is in the buying journey)</p></div>
<div class="recipe-numbering-wrapper"><div class="recipe-numbering-step">6</div><p>English (to show a customer’s preferred language)</p></div>
Textline allows you to easily improve contact categorization with Tags. This Automation is simple to set up and scale. Want to see it in action?

